Hello Velas,
your question is not really clear for me. I don't know whether the following answer does address your application or not. Let me summarize how I understood it:
- There is one Path Data object describing the entire curve.
- Parts of the curve lying above zero should appear in color CA with thickness TA.
- Parts of the curve lying below the zero should appear in color CB and thickness TB.
If this is your application case, following would be the steps:
Step 1: First at all, manage the complete curve information within one (1) Path Data object. I see, there are some gaps in the curve from the screenshot above. If this is intentional, store each contiguous curve as a separate sub-paths. For example:

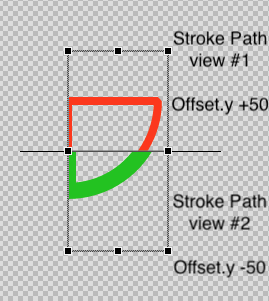
Step 2: In your component (where you plan to display the curve) add two (2) Stroke Path views.
Step 3: Arrange the first Stroke Path view above the zero line. Configure the red color and the desired line width in the view.
Step 4: Arrange the second Stroke Path view below the zero line. Configure the green color and the desired width in the view.
Step 5: Connect both views with the same Path Data object from the step 1.
The views display now the same curve. In the upper area (above zero) the curve appears red. In the lower (below zero) it appears green.
Step 6: Use the Offset property of the first view to move vertically the origin of its coordinate system. You change only the y component of the property. See also Determine the origin position for the path coordinates.
Step 7: Similarly, adjust the Offset property of the second view to move vertically the origin of its coordinate system in opposite direction.
By correctly adjusting the Offset properties, the curves will overlap then as shown in the screenshot below. At the edges of the views the curves are clipped. Here the both views display the same Path Data:
Step 8: If you want to scroll the curve interactively, add the Slide Touch Handler to the component.
Step 9: Configure the area to slide in the Slide Touch Handler. It should correspond to the horizontal size of the entire curve. See also Configure the slide range.
Step 10: Add a new slot method to the component.
Step 11: Assign the slot method to the OnSlide property of the Slide Touch Handler. See also Implement Touch Handler slot methods.
Step 12: Implement the slot method with following or similar code to adjust in the both views their Offset property horizontally:
StrokePath1.Offset.x = SlideTouchHandler.Offset.x;
StrokePath2.Offset.x = SlideTouchHandler.Offset.x;
Now, when the user touches and drags within the Slide Touch Handler, the position alternation adapts the x component of the both Offset properties. The upper part of the curve as well as the lower part moves simultaneously.
I hope it corresponds to your application case.
Best regards
Paul Banach