327 views
in GUI Development by

Hi Paul,

I tried your example and it is working fine. But I am also doing a R & D to create similar screen by using menu, menu item & open menu item without using vertical list in order to get advantage of ready to use templates.  Similar to this design I have created separate items using menu item template and open menu item. There are three functionalities need to be implemented. One is, if a menu item with combo box is touched , a drop down option need to be shown. second one is if a menu item to expand is touched then the screen should be expanded below the corresponding item. And the final one is an open menu item to go another screen. How this functionalities can be implemented similar to the above example you have created? and how the data providers can be connected. Please assist me to design this screen with required functionalities.

Regards,

Sazna.

1 Answer

0 votes
by

Hello Sazna,

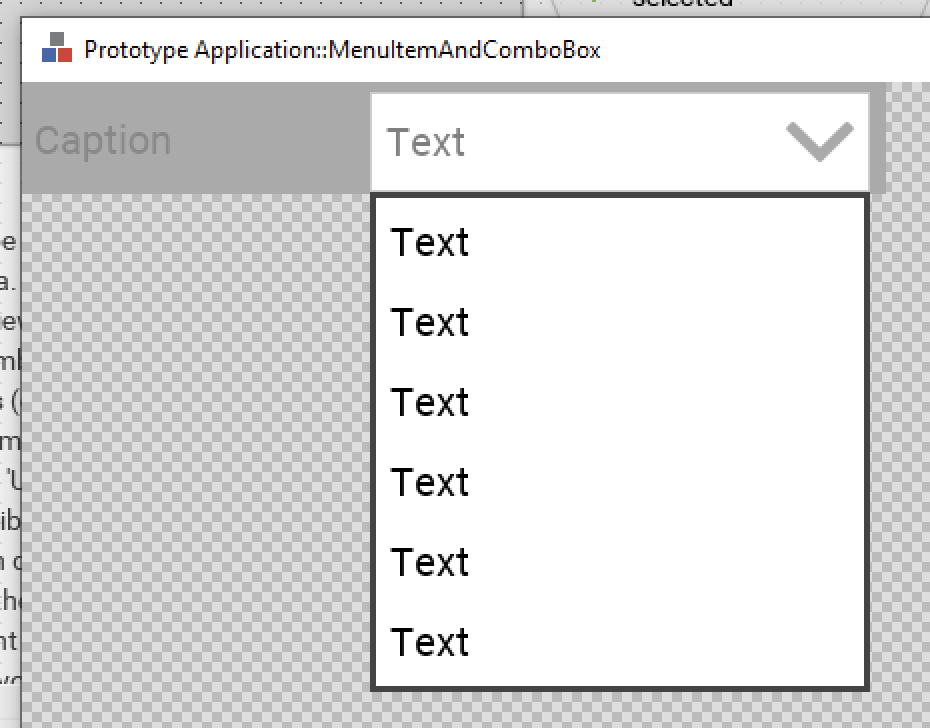
in principle, your project contains already all the necessary functionality. However, when the menu is started, the items appear clipped, for example, you don't see the item contents. The cause of this issue is the mechanism how the menu calculates its layout and its size. For this purpose, the menu asks all items for their minimal size requirements and based on the provided information, the menu estimates its minimal size. To query the minimal size requirements the menu items implement the method GetMinimalSize(). For example, in case of the OpenMenuItem, implementation of the method calculates the space needed for the item caption and the arrow image enhanced by a padding of 10 pixel:

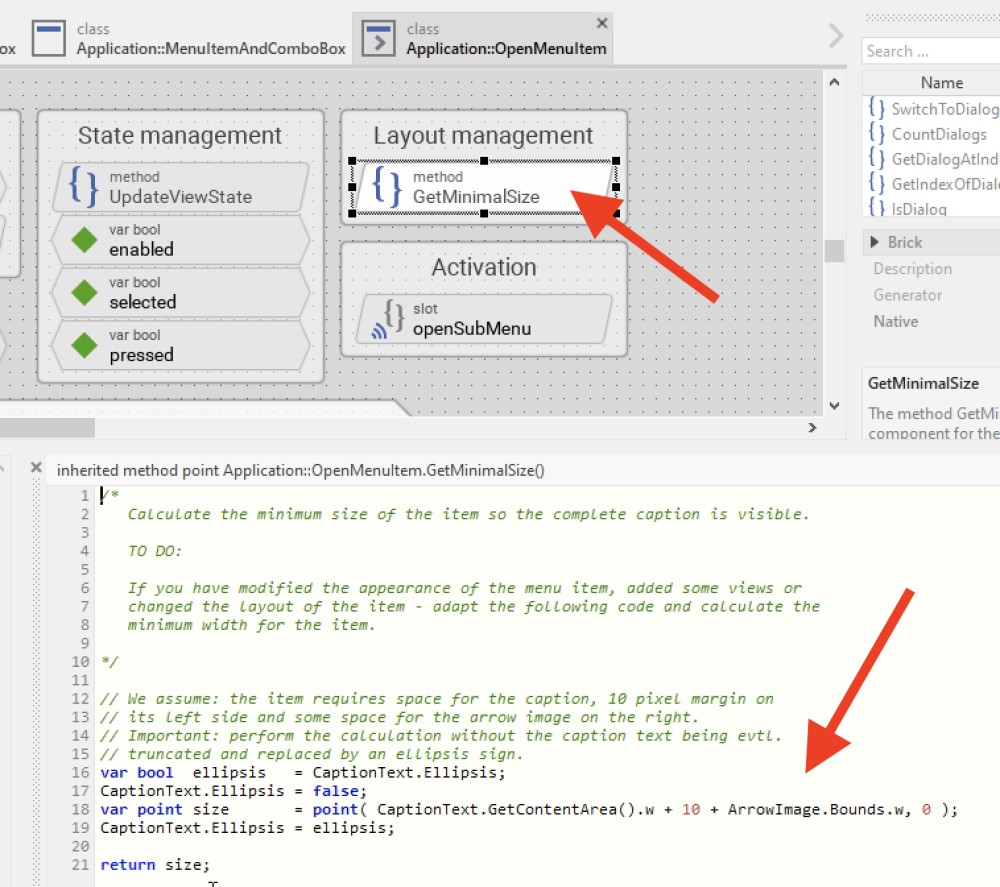
The item components in your project have been modified and enhanced by additional Text, etc. contents. The items require now more space. This enhancement, however, is not taken in account in the GetMinimalSize() implementation. Since your design expectations are unknown for me, I can't provide you a ready implementation of the GetMinimalSize() methods. But you can imagine, if you want two Text views to be arranged side by side, then you have to adapt the GetMinimalSize() method so it estimates the space needed for the first and the second text and adds them together - similarly to how the width of the text and image is added in the above implementation. The same is true for the item containing the ComboBox. There you have to estimate the minimal width of the box and add it to the width of the caption and evtl. other text views.

Please note, the value returned by GetMinimalSize() is used to estimate the minimal width of the menu itself. Consequently, if one item requires 100 pixel space and the second item requires 250 pixel, then the menu will assume total width for at lest 250 pixel. All items are then resized to fill this estimated width. The first item, originally 100 pixel wide, will thus be enlarged to 250 pixel.

This size alternation of a component have to be taken in account when you design the item. In the simplest case, you have to configure the Layout property of the views existing within the item (e.g. Text, ComboBox, ...). With the Layout property you can determine whether the view should has fixed size or whether it should be resized proportionally to size alternation of the superior component (of the item), or how should the view be aligned within the component. See also the section Configuring component layout. As soon as you have arranged the views within the item, configured the Layout properties of the views and adapted the GetMinimalSize() method of the item, the item should appear correctly within a menu.

One is, if a menu item with combo box is touched , a drop down option need to be shown.

Concerning the item with an embedded ComboBox (drop down list), this should work as it is. In your actual project the drop down list appears empty, because the list has no content. The property NoOfItems of the ComboBox component is 0. As soon as you setup the ComboBox with real values > 0, the list appears with some content. Of course, you will also need to implement the OnLoadItem method to provide the list contents:

second one is if a menu item to expand is touched then the screen should be expanded below the corresponding item.

The second application case implies that the height of the item changes. This means, you change the Bounds.h property of the item. This will trigger automatically the menu to recalculate its layout and the position of all following items. For example, the following code toggles the height of the item between 100 and 200 pixel:

if ( Bounds.h == 100 ) Bounds.h = 200;
else                   Bounds.h = 100;

And the final one is an open menu item to go another screen.

I suppose, with another screen you mean another menu, right? In such case, use the OpenMenuItem template. This template contains a property named SubMenuClass. When you assemble a menu from items, configure the property with the class implementing the menu where you want to navigate. 

In this context a hint: actually you have one menu component in your project containing all the items. This is ok, as long as you plan just one menu screen. For complex, nested menu systems I would recommend to:

1. First add a new menu component to your project using the provided Menu component template. Thereupon you will get some new component named, e.g. Application::Menu.

2. Then derive from the just created menu component sub-classes - as many sub-classes as diverse menu screens you plan to implement.

3. Then edit the sub-classes and add items to the sub-classes. Don't add items to the original menu base class.

4. Using the OpenMenuItem you can implement navigation between the menus.

See also the chapters Creating components from templates: Menu and Creating components from templates: Open Menu Item.

I hope it helps you further.

Best regards

Paul Banach

by
Hi Paul,

When considering menu item with combo box, I use this class as several instances in menu component. So I need to load different list parameters for each instances. How this possible dynamically? When using vertical list I have created data containers to load the list parameters. For this case How it can be done?

Regards,

Sazna.
by

Hi Sazna,

the approach with data containers (or more general said 'data providers') is fully correct. When using the vertical list, you surely assigned the data container to the item when the item was loaded. When using the menu templates, you assign the data container directly to the item already at the design time. Following could be the steps to achieve it:

1. Add to the item a property and name it e.g. DataProvider

2. Configure the type of the property to correspond to the name of the class implementing your data container.

3. Edit the OnSet method of the property, so that the number of values stored in the data provider is used to initialize the ComboBox's property NoOfItems. Following or similar could be the implementation. Note, I assumed there is some GetNoOfValues() method implemented in your data container to query the number of values to display in the ComboBox:

4. Adapt the OnLoadItem slot method associated to the ComboBox to load the item contents from the data provider. Following or similar could be the implementation. Note, I assumed there is some GetValue( int32 aIndex ) method implemented in your data container to query the value with the number aIndex:

4. When you assemble a menu from items, assign the right data provider object to the DataProvider property of the item.

Does it help you further?

Best regards

Paul Banach

by

Hi Paul,

I Implemented above steps here. But when assembling menu from items, in the inspector window of the menu item with combo box I can't find options to provide DataProvider property. What could be the issue in this approach?

Regards,

Sazna.

by

Hello Sazna,

the DataProvider property is available:

There you can assign an object of the DataProvider class containing all relevant entries. This means, you have to prepare an object. I think, you made it already with the Vertical List.

Best regards

Paul Banach

by

Hi Paul,

Yeah you are right, the data provider property is available but the issue is when I press the data provider there is no option to select. 


Regards,

Sazna.

by

Hello Sazna,

there are no options because there is no instance of the DataProvider class existing in the actual scope. Try following:

1. Switch to the Browser window.

2. In the Browser look for the class of the Data Provider you want to create an instance. You can use the search edit field in the upper area of the Browser window.

3. Once you found the class, drag & drop it into the Composer window with the Menu component. Following screenshot illustrates the steps:

In this manner you have added an instance of the Data Provider class (here concrete an instance of the class Application::AlarmDataProvider). Now, the just created instance appears in Inspector:

The just created Data Provider object exists locally within the menu only. It is embedded inside it (see also Embedded objects). It means, the object is instantiated just in the moment when the menu component is instantiated. When the menu component is discarded, the object is also discarded. On the other hand, if you have 3 different menu components, all using the same Data Provider, each menu will manage its own instance of the Data Provider including also all the code needed to initialize the object.

Therefore, if you plan to share Data Provider objects across multiple menu components, it could be better to create a global Data Provider instance. In such case, you drag & drop the Data provider class into a unit, for example into the Application unit. Please note, you have to press the Ctrl+Alt keys before you start the drag & drop operation, otherwise you create a copy of the class instead of its object (see also the chapter Gallery Browser window for more details):

In this manner yu create so-called autoobject. It is a global object, which is instantiated dynamically when it is needed and it is released automatically, when it is not needed anymore - even auto-object. Now, the Inspector displays this global object and you can connect the menu item with it:

The abve described approaches create the objects as project members (either within a unit or a GUI component). If required you can also create the instance dynamically using the new operator. In such case you write the expression new Application::AlarmDataProvider directly as initialization of the property DataProvider:

Well so far the technical concepts to create and manage instances. I hope it helps you further. Please note, when you connect the menu item with some data provider object, the corresponding object is brought to life. It means, the object performs all own initialization steps. If there is a problem in the initialization, Embedded Wizard reports an error. In the concrete case of the AlarmDataProvider following error is reported because this object depends on Device object, which is not available in your project. You will need to correct it:

Best regards

Paul

by
Hi Paul,

It gave better understanding and now able to connect.


Regards,

Sazna

Ask Embedded Wizard

Welcome to the question and answer site for Embedded Wizard users and UI developers.

Ask your question and receive answers from the Embedded Wizard support team or from other members of the community!

Embedded Wizard Website | Privacy Policy | Imprint

...